Steps to setting up a Windows Server 2003 Web Server on VirtualBox
The following goes through the steps needed to setup Windows Server 2003, with Web server capabilities (IIS 6 in this instance), on a Sun VirtualBox virtual machine.
Why Windows Server 2003 when Server 2008 is out and available? Because a large number of hosts (mine included) haven't made the switch yet.
Requirements
- Sun VirtualBox. We want this in particular for the great networking functionality, but other apps, like Microsoft Virtual PC, will work fine as well. I used version 3.0.8 r53138 on Windows 7 Home Premium 64-bit for this guide.
- A copy of Windows Server 2003. In my case, I picked up a copy of Visual Studio 2008 Professional with MSDN Professional, which gives access to a large number of Windows Operating Systems and tools. Microsoft offers a number of subscription options.
- A computer that with a good amount of RAM and processor. The machine I used for this guide has 4 GB of RAM and a 2.20 GHz processor.
VirtualBox setup
- Install VirtualBox, making sure that you install any network adapters VirtualBox may need.
- Create a new virtual machine.
- Give the virtual machine a good name, such as Windows Server 2003 - Web Server 1.
- Select Microsoft Windows - Windows 2003 as the operating system and version.
- Feel free to bump up the base memory size, but if looking to mimic an external server, try to use it's specs. I typically stick to the default of 256 MB.
- Create a new hard disk, of the type Dynamically expanding storage; this allows you to create a large disk, but only have it take up the space it needs.
- Give the disk a good amount of space; I generally change from the default of 20 GB to 50 GB, since it's not easy to increase this later, but you'll typically never go above 10 GB anyway.
- Change the Network Adapter from the default of NAT to Bridged Adapter. This will allow you to reach both the Internet and your internal network.
- With the machine setup, you'll want to verify that your Windows Server 2003 installation media is available. If using MSDN, that means adding your downloaded ISO to the Virtual Media Manager (FIle > Virtual Media Manager) under CD/DVD Images.
- Start the machine, attaching the ISO when prompted.
- Generally the defaults are acceptable.
General Windows Server 2003 setup
- Once Windows Server 2003 is installed, install the guest additions (Devices > Install Guest Additions); it'll save you a deal of time.
- Update Windows Server 2003 as needed.
- In particular, I like to download the current version of ASP.NET and install IE 8 (although I do the latter as a separate update; I've had issues otherwise).
- At this point I like to exit out of the machine and clone the hard drive. I'll have activated the license and have a nice hard drive, with the current updates. If I want to create another Window Server 2003 instance, it's easier to just use a base drive and customize as needed. Your decision. (The VirtualBox (VBoxManage) command is clonehd.)
Specific Windows Server 2003 setups
With a base install ready, we can go in various ways with our installation. By default, almost no services will be up and running.
In this particular instance, we just want to run IIS 6.
- Make sure you're in the Manage Your Server application. See this.
- By default it will start automatically (a good thing) or you can find it at Start > All Programs > Administrative Tools > Manage Your Server.
- From the options, select Add or remove a role.
- We want a Custom configuration, since we just want a Web server.
- For our needs, we want our server to be an Application server (IIS, ASP.NET).
- We only want to enable ASP.NET, not FrontPage Server Extensions (unless you particularly know you want that).
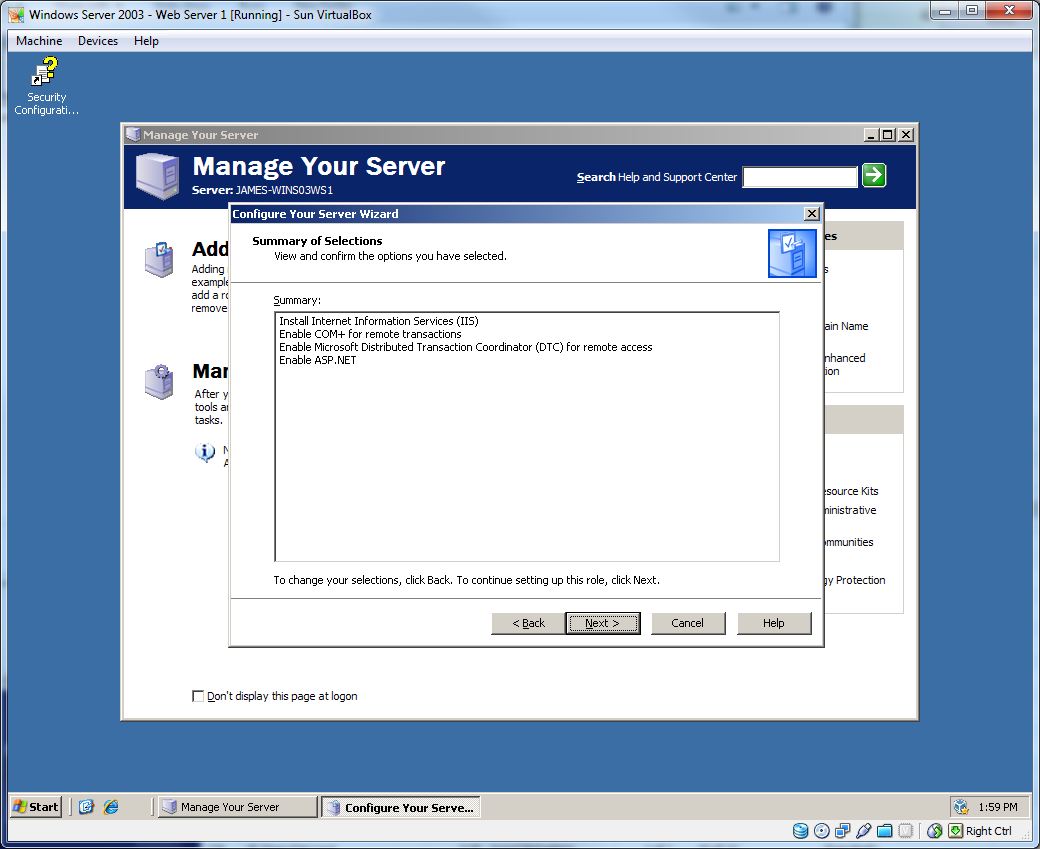
- Our summary reads something like the following. See this.
- Install Internet Information Services (IIS)
- Enable COM+ for remote transactions
- Enable Microsoft Distrubuted Transaction Coordinator (DTC) for remote access
- Enable ASP.NET
- You may be prompted to insert a CD, at which point you'll want to mount CD 1 of the R2 discs, and not CD 2. You can play around with this as needed.
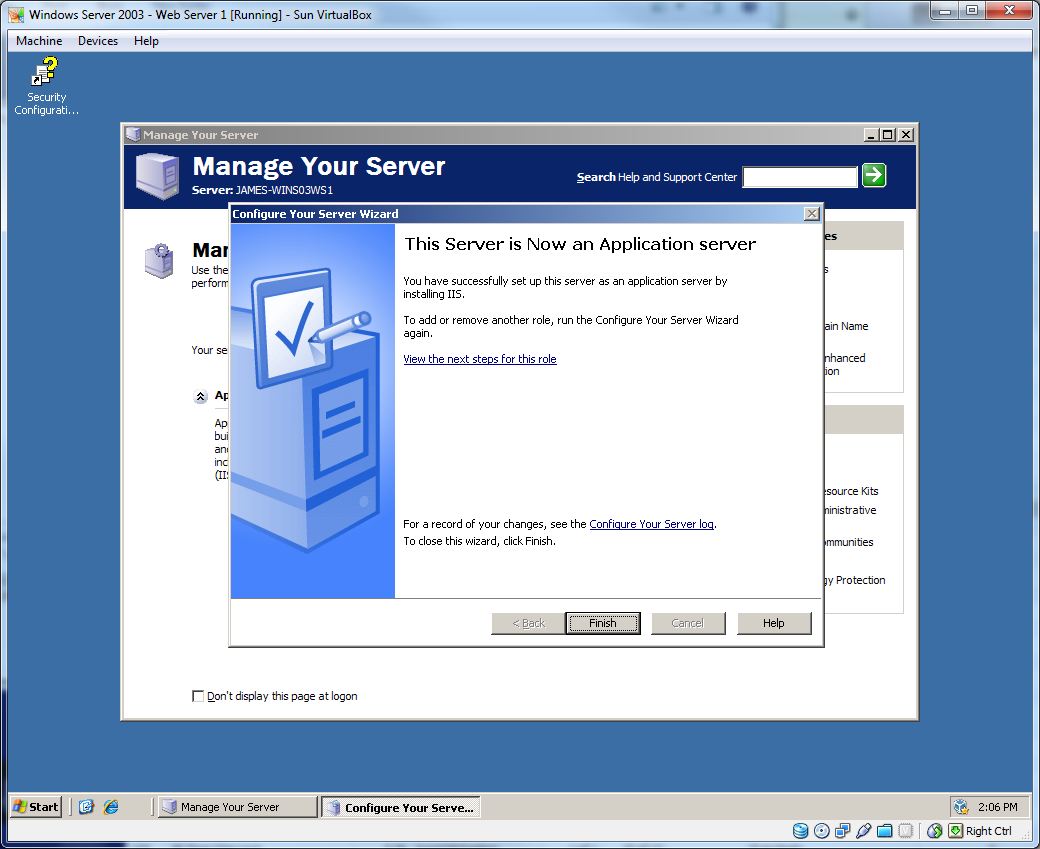
- Shortly, you see that "This server is Now an Application server." Included on this page is a link to view additional steps to secure the server. See this.
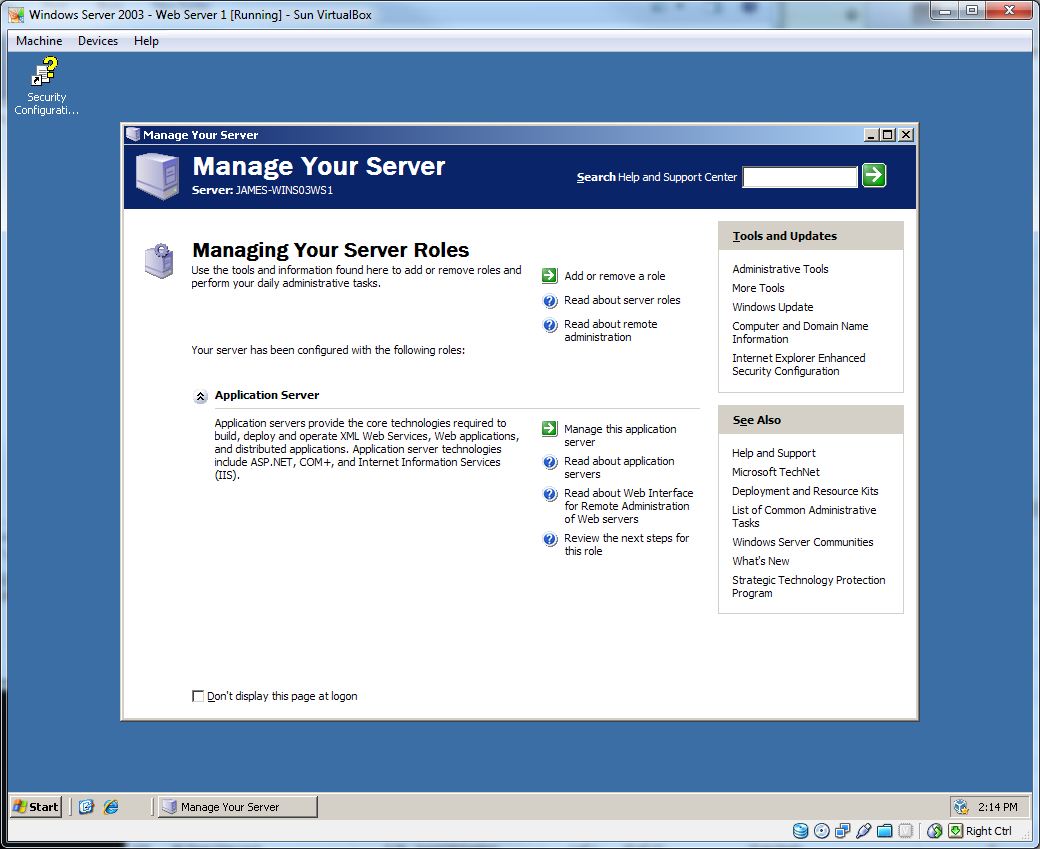
- You should now see that the Application Server role is now available to be managed. See this.
- Opening a browser and calling http://localhost/ should now display the standard Under Construction page.
- Go to Windows Update and install any needed updates.
- Assuming you've setup a Bridged Adapter in Network for the virtual machine, you should now be able to browse to the virtual instance in your host machine. You can use both the IP as well as the server name. For example, http://james-wins03ws1/ or http://192.168.1.106/.
- This can be found by opening a command prompt (cmd) and running ipconfig /all and finding the IP Address.
Conclusion
At this point you've successfully setup IIS running on Windows Server 2003, in a virtual machine, and are able to connect to it from your host machine.
You can now mimic a real machine as much as you'd like, for example by setting up FTP (FileZilla Server) to move files between the machines.
I recommend just using VirtualBox to move files between the two; Devices > Shared Folders will let you setup temporary and permanent folders.
Questions, comments, and suggestions are appreciated.
Search
Links of Note
Support This Site
If my blog was helpful to you, then please consider visiting my Amazon Wishlist.